Home LIFTGATE OPENER SWITCH REMOVAL/INSTALLATION
id091400516100
1. Disconnect the negative battery terminal. (See NEGATIVE BATTERY TERMINAL DISCONNECTION/CONNECTION [(E)]
2. Remove the following parts.
(1) Side spoiler (See SIDE SPOILER REMOVAL/INSTALLATION
(2) Liftgate garnish (See LIFTGATE GARNISH REMOVAL/INSTALLATION
(3) Liftgate upper trim (See LIFTGATE UPPER TRIM REMOVAL/INSTALLATION
(4) Liftgate side trim (See LIFTGATE SIDE TRIM REMOVAL/INSTALLATION
(5) Liftgate recess (See LIFTGATE RECESS REMOVAL/INSTALLATION
(6) Door lock switch (liftgate) (with advanced keyless entry system) / Power liftgate (PLG) rear switch (with power liftgate) (See DOOR LOCK SWITCH REMOVAL/INSTALLATION [(E)] POWER LIFTGATE (PLG) REAR SWITCH REMOVAL/INSTALLATION
(7) Liftgate lower trim (See LIFTGATE LOWER TRIM REMOVAL/INSTALLATION
(8) Rear finisher (See REAR FINISHER REMOVAL/INSTALLATION
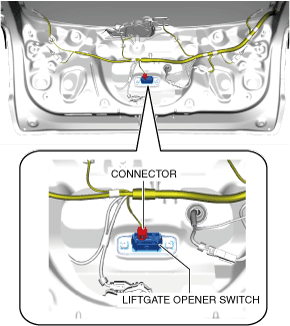
3. Disconnect the connector.
4. Remove the bolts.
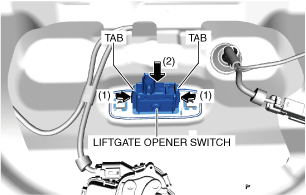
5. While pressing the liftgate opener switch tabs in the direction of arrow (1) shown in the figure, press it in the direction of arrow (2) to detach the liftgate opener switch tabs from the liftgate.
6. Remove the liftgate opener switch.
7. Install in the reverse order of removal.